Here's what I started with:


Here's what I started with:
After we got engaged, I became a bit more serious about this aspect of our wedding. I really want to have pro photos of our day, but financially it just can't happen. Then my MOH saved the day. While discussing this particular aspect of the wedding, she reminded me that we have two friends who are journalists who also happen to take amazing pictures. I really wanted to have a photo-journalist approach to our wedding and I quickly asked both of them if they would take pictures for us. They said yes! I hope these two awesome people realize how much I appreciate what they are going to do for us.
So a few weeks ago we had our engagement party and got our engagement pictures done by my MOH and her partner. Her partner is one of the friends who is going to take our wedding pictures. I'm so thrilled with how the pictures turned out that he took.
I can't wait to see what is taken of our wedding day! Yay!


The problems I have with all the birdcage veils I can find online to buy are quite numerous:
--They have big flowers or feather attached to them.

Source:Wedding Bells
--They have too much tulle or netting and look like something has exploded on your head (this might just be my problem).

Source:Wedding Bells
--They are too expensive for this DIY cheap-o. Seriously, the one blusher I tried on in the shop was over $150 dollars. I know you can find reasonable ones online, but I still couldn't find anything that I liked enough.
So I made mine instead. And with my Spotlight membership, the netting only cost me $7.49 for a meter of it. Bam! (Sometimes I think I am Emeril Legasse BAM). Everything else I already had at home. So here is a photo tutorial of what I did with my finished veil at the bottom.

All I needed.

What you can't see is the first step: cutting the meter length in half and sewing them together before I sewed all along the outside edge to gather it. Took 4 episodes of Friends to do that.

I then gathered it and shaped it the way I wanted it. Pinned and sewed it to the comb.

Adding my own touches to it.

I'm only wearing my veil for the wedding, so I thought some bright colored beads would liven it up a bit.

Ta-da!

Final verdict? It's still bigger on top than I would like, but I need to see it on my head with my hair all done up before I can tack anymore of it down. The plan is to have a second comb in my hair that has 2 or 3 multicolored ribbon flowers in it that will stay in my hair for the reception. My hair will be up somehow (depending on the skills of whoever is doing my hair) but I can't figure out how since my hair is a hot mess right now. Short is nice and casual, but my hair doesn't like to hold curl, I don't want to look like a six-year-old pretending to get married with sausage curls and it needs to be pinned back.
So what do you think? Does my DIY veil stand a chance of looking awesome on my wedding day? In the end, it was under $8 and only took a couple hours of my time.
Our wedding is on a really tight budget. As in we can't actually afford everything we want for our wedding and so we're calling upon all the creative people we know to help make our wedding day happen.
I have days when I think it would be so much easier to just hire someone to do all of the things for me. Then I think that it wouldn't truly reflect who we are.
Compromise is a huge part of my life right now. I had to trade paper products for our homemade invites because I couldn't justify $100 on card stock when I could get all the paper I need in the same style for $40 by just having regular paper. Jeff also wants to have lights in each of the lanterns we are buying and hanging in our reception room. I hate to squash his dream there, but buying little battery-operated tea lights for the lanterns is just more than we can handle. I keep telling him that we'll have our 4 giant strands of twinkle lights peeking through the lanterns, but my words are falling of deaf ears.
I'm currently making my own blusher birdcage veil since we can't afford to buy one (or find one that I really like). It's costing me $8 dollars (for the netting) and everything else I already have at home. It's taking a lot longer than I thought it would, but I'm excited to get it done and then have my hair trial in November so I can see what it'll look like with my hair all done up.
There are countless little details that need to be organized and sorted out for our wedding that sometimes I think it might never get done. But then Jeff wraps his arms around me, kissed my shoulder and tells me he loves me...and suddenly all is right in the world and I can accomplish our dream wedding on pennies and start our marriage off with an amazing day.
What have you struggled with? Is your real wedding matching up to the dream in your mind?

Source:Pinterest
I happened to find an old suitcase at a vintage shop in town for $25.

I have a vast collection of random fabrics, both vintage and new. I found something that worked with my wedding plans. I then modge-podged the fabric into the suitcase because there was no lining in it at all.

I finished that and moved on to the lettering. I printed out large letters on my printer, cut them out, traced them onto my cardstock backwards and then cut those out (so my tracing lines are on the back since my cutting isn't so great). I glued them onto some twine, added ribbon from my ribbon drawer, put some old light fixture plastic beads on and then decided it needed glitter.

Here's a close-up of my work.

All I have left to do is attach some removable hooks to the inside and I can hang my sign across the top. I also found a perfect piece of crocheted doily to lay across the bottom. I was pretty proud of the work I did over a weekend on this.
All in, this project only cost me the 25 dollars I spent on the suitcase. Everything else I already had at home. This is when my craft supply hoarding will pay off. I have been collecting odds and ends of supplies for years for no apparent reason, but this project just proved to me why I do that. It really is worth it. :)

I drool over the dress forms available at Spotlight every time I go there but I still can't imagine dropping that much cash for something that still won't be my exact measurements.
Now with my wedding dress drawn up, I realize I really cannot possibly drape, pleat and fit my dress the way I have been doing all this for the last 10 years- by myself on myself. Uh-uh...not happening. So we made a dress form at home. We didn't take photos in the process of taping me up (mostly because they would have been incredibly inappropriate since I couldn't find any shorts to wear and the tape pulled the shirt up higher than it was supposed to. But here's the run-down of what we did:
1. I put on a shirt and covered my neck and collarbone area with plastic wrap.
2. Jeff used three rolls of tape to capture my figure. The first roll of tape was plain packing tape. The next two were duct tape.
3. We underestimated how much tape it would take, and Jeff went and found electricians tape to finish out the body-taping job.
4. By this point there wasn't enough tape covering my collarbones, but we were out and I couldn't breathe deeply because of how tight the tape job was.
5. Jeff cut me out of the tape shirt Phew, I could breathe again!
6. We put my form over the homemade music stand Jeff had in the spare room and I left it for a day since we had no tape.

7. I went out and bought more tape and came home to finish the dress form.

8. I then covered my pretty form with some leftover fabric so I can pin to it.

9. I must have checked my measurements against the dress form 10 times...they're pretty close except for my overbust measurement. The dress form is about 4 inches broader there than I am in reality. But it's okay because the final fittings of my dress will be on me, not the form.

So am I happy with the work we did even though it's a bit trashy and not quite right? Yes because what I need this form for is to drape and look at pieces before I sew...and that's what I can do with Betsy (I just gave her that name...she needs a name, right?)

Our wedding is a reflection of our personalities: vintage, comfortable and bright details that embody our souls. Our wedding is a celebration of the coming together of two creative, quirky souls in a unique matter that reflects our life philosophy of recycling, re-using and creating what we cannot afford. At the end of the day, we hope you leave satisfied, both by the yummy food our families helped create and by the fun atmosphere created by those we love and hold most dear.
I see you wondering how this is going to translate into our actual wedding day. Here you go.
Here are some images that have inspired our wedding day and will keep both Jeff and I busy for the next five months!

Photo:Style Me Pretty
We will have long tables with no assigned seating. Growing my own flowers and hoarding vintage tablecloths to decorate the tables ourselves.

Photo:The Knotty Bride
The wedding party will be wearing grey and no full suits for the fellas. Keeping it casual and fun with bright colors as accessories.

We're going to make all the signage and paper goods ourselves to keep down costs. It's a good thing we're creative!

This is something I was in love with, but thought we could live without it. Jeff disagrees, so we're hoarding paper lanterns too to hang from our reception space ceiling!

Since we are diy-ing our wedding, we decided to keep it earthy and natural. One of Jeff's jobs is to cut 100 rounds of wood to use for our tables. Glass jars are coming from my FMIL and flowers are coming from my garden.
Can you see what we're going for here? I know there's a lot of inspiration like this online right now, but I still have not been to a wedding that actually does any of these things. Our wedding will reflect who we are as a couple and as I look around our home, I see that our home already does that too.


The collage with purple is the dress I've fallen pretty hard for. It made my figure look amazing (who knew I had a waist?) and was a stunning color and feel.
I did notice that when I sat down in it I had perfect posture (thank you boning) but I also had va-va-voom boobs. Seriously ridiculous and needing a little more control. Unfortunately it was also nearly $2k and we're hoping to keep our entire wedding under that. While that dress was phenomenal, it was also way too fancy for the wedding I have planned. The deep v-neck of the dress above made my chest appear smaller and more controlled (important for a large-chested woman such as myself). So what's a girl to do?


Design her own dress of course! So I'm using a pattern I bought at a vintage shop to start the dress, but then I'm altering it all to suit the parts I liked about the wedding dresses I tried on.

Below is my favorite part of the dress I'm going to make- a rainbow-esque crinoline!

The fabric I got on sale a few months ago. It's a creamy white and the lace is my mom's veil from her wedding. It's the only thing she has left from her wedding as she lost her own handmade dress in a trans-Atlantic move when I was younger.

I'm excited and nervous about making my own wedding dress, but I know I have the skills to do it. I just finished making the body double so I can do the draping of my dress without having to constantly be trying it on. I'll post pictures and the how-to we used in making my dress form.
Jeff is excited about my wedding dress. So even though he knows what it looks like, I already told him he doesn't get to see me actually in it until the day of. Fair is fair, I think.
Next up is the corselet for under my dress. It's gonna have a lot of boning in it and be laced-up to get my hourglass figure to show up. I better get to work!
All photos are personal.
Which dress do you think looked great on me? What are your thoughts on the dress design I drew up? Am I crazy for attempting to sew my own wedding dress without a clear pattern? :)
Okay, Mom...yeah, like we have a date in mind already...
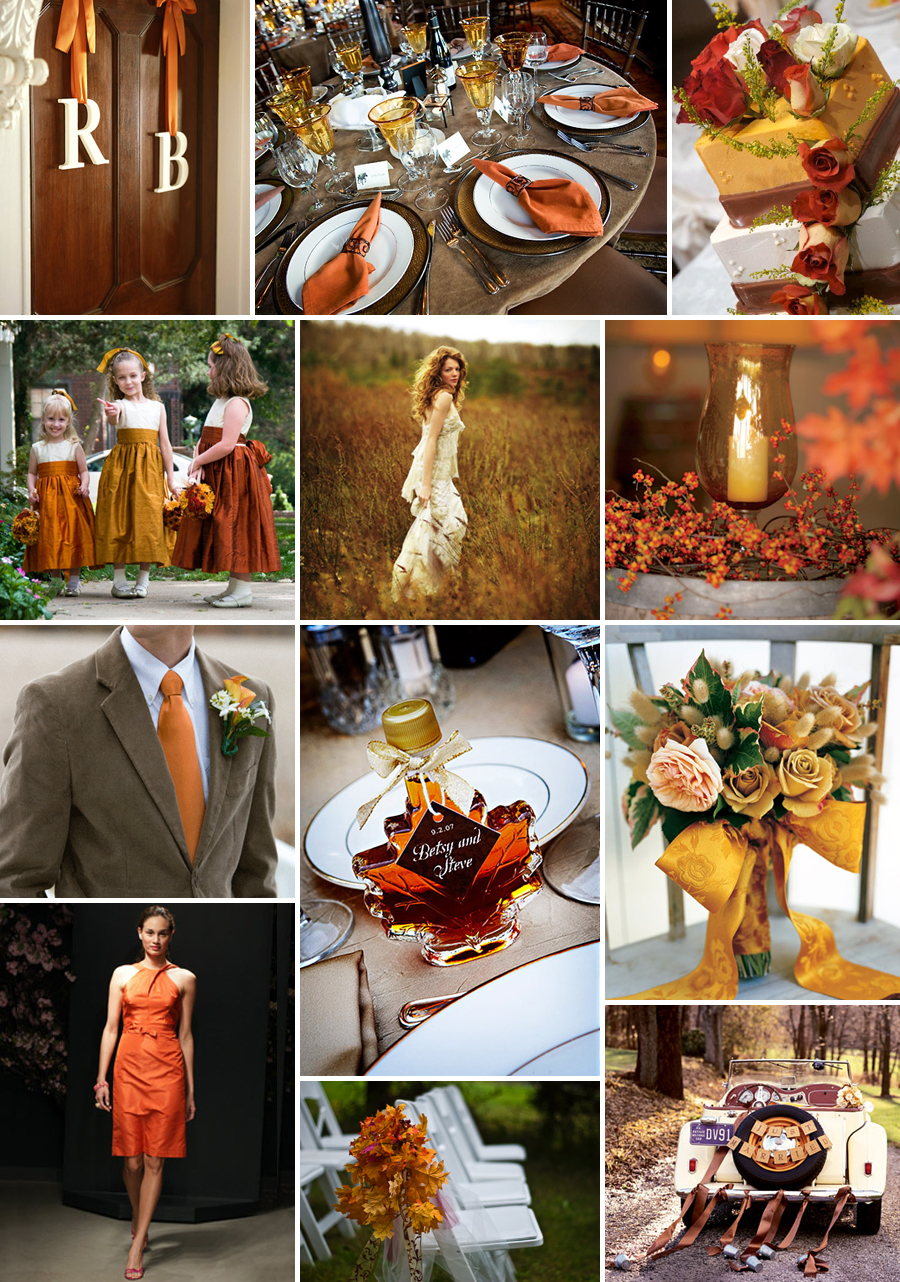
I love my mom and I'm so glad she was excited for our engagement. (She screamed when I told her over the phone...I think she's going to be a screamer at any and all big news I'll ever have to tell her). But it's been 30 minutes since we got engaged, not time to have a date in mind. It took a couple days for us to actually talk about what time of year we were looking at for our wedding. I've always dreamed of a outdoorsy, autumnal wedding. Like this one:

Jeff had a summer wedding more in mind. Since New Zealand summers are incredibly mild, I didn't really have a problem with that idea. We started looking at calendars, considered overseas travelers, and finances before deciding to find a venue that could host a Tuesday wedding at the end of February or early March. Now to find a reasonably priced venue... We planned on a Saturday to go around and look at places I had found online. I called a friend and had her tag along to discuss possibilities. There are literally hundreds of places to get married around Nelson. So many churches, vineyards, resorts, etc. I had decided I wanted to get married in an old church and finances dictated that vineyards were out. So here are some places we looked at...


Wow, I had found it. We had a winner. The church was old like I wanted but not claustrophobic like other old churches I have been in.

No weird aisles to deal with, organs that cannot be moved (seriously, one church had a huge organ that wasn't allowed to be moved). And it's an intimate space for the small wedding we were wanting.


What do you think? Did you struggle to find a location that met all your criteria for a perfect wedding?
All images, unless noted, are personal pictures.